
What if the colors on a push-up board were a hand-placement map, not a promise to isolate one muscle? Color systems vary between boards, and every push-up variation works several muscles together. A color coded push up board workout can still add structure and variety when you use the markings as a guide and focus on controlled movement.
Start with the board’s own position guide. Choose a placement that feels manageable, set your body in a steady line, and lower only as far as you can control. You don’t need to try the hardest variation or every marked position in your first session.
This guide explains how to read board positions, adapt push-ups to your current ability, and build a balanced routine with form in mind. It also covers what to compare when choosing a board, from the clarity of its position guide to how it fits your space. Motion Nest’s Coded Push Up Muscle Board is one option for a board-based routine.
Key Takeaways
- Treat board markings as hand-placement guidance, not a promise that one muscle works alone.
- Use hand width, angle, and body alignment to explore pressing variations you can control.
- Compare board and floor push-ups by setup, placement guidance, variety, and learning curve.
- Build a beginner color coded push up board workout with a warm-up, manageable positions, rest, and a form check.
- Before choosing a board, review its position guide, markings, stability information, and storage fit.
What a Color-Coded Push-Up Board Workout Can, and Cannot, Do
A color-coded push-up board marks hand positions to help you set up different variations. Using the same marked points can make your setup easier to repeat, while changing positions gives you a structured way to explore different hand widths and angles. The markings don’t mean that one muscle works on its own, and they can’t ensure that every repetition feels or looks the same.
Compared with floor push-ups, a board gives you visible placement points to follow. The floor lets you choose your hand position freely and requires no dedicated equipment. Neither option is automatically better. Consider whether you prefer a set layout, want to change hand positions without a guide, or would rather keep your routine simple.
How color-coded positions guide hand placement
Moving your hands between marked positions changes their width and angle, which can change how the movement feels. For example, try a wider placement and compare it with one closer to your body’s center line. Focus on comfort and control rather than assuming one setup is right for everyone.
Color meanings aren’t universal. A shade that indicates one placement on one board may mean something else on another. Follow the guide supplied for your board and use the printed layout, not color alone. For a broader overview of the exercise and its variations, see Push-up.
Place the handles where the board’s guide indicates. Set your body in a steady line, then lower and press at a pace you can control. If the position feels uncomfortable or makes it difficult to maintain alignment, switch to another placement or use an easier push-up variation.
What a color-coded board does not guarantee
Colored markings don’t guarantee perfect form, muscle isolation, or faster progress. Push-ups involve several areas of the upper body and core. Changing hand position may change the movement’s emphasis, but it doesn’t switch other muscles off. Use the color map to explore variations, not as a precise measure of which muscles are working.
Difficulty also depends on your strength, body position, and range of motion. A controlled repetition may feel different from a rushed one, even at the same marked placement. Keep your body aligned, use a range you can manage, and pause if you feel pain. The board can guide your setup, but you control your movement.
Motion Nest’s Coded Push Up Muscle Board is an option if you want a board-based setup. Compare its position guide with the variations you plan to practice.
How to Match Push-Up Board Positions to Your Workout Goals
Choose a board position for the pressing variation you want to practice, not because a color promises to isolate a muscle. Hand width and angle can change how a push-up feels, but your chest, shoulders, arms, and core still work together to support the movement. Look for a setup that fits your routine and lets you stay in control.
Changing your hand placement changes the angle and feel of a push-up, which can shift movement emphasis without isolating one muscle. Use that as a way to introduce variety, not as a guarantee of a specific result.
Choosing positions for chest, shoulders, and arms
Think in broad terms. A wider hand position may feel different from a narrower one. Turning your hands or changing their position relative to your shoulders can also alter the movement. These are ways to explore pressing variations, not a universal formula for training a single area. For background on push-up form and variations, Harvard Health Publishing offers further reading on the exercise.
Use your board’s guide to identify each placement. Don’t assume a color used for one muscle group on another model means the same thing on yours. Try one position, notice how the movement feels, and keep your body aligned as you lower and press. If a setup feels awkward, choose another instead of forcing the repetition.
- For pressing variety: Compare a wider hand placement with a narrower one, if your board’s layout includes both.
- For shoulder comfort: Choose a position that lets your wrists and elbows move comfortably through the repetition.
- For arm emphasis: Try a closer hand placement only if you can maintain steady alignment and control.
These examples describe how a movement may feel, not guaranteed muscle targets. Push-ups recruit overlapping muscle groups, and the effort you notice can vary with your technique and ability. A comfortable, controlled repetition matters more than matching a color label to an anatomical claim.
Adjusting board exercises to your current ability
Start with a manageable position and a range of motion you can control. Lower only as far as you can while keeping your torso steady. If a full push-up feels too challenging, try supporting your knees on the floor while maintaining a straight line from your head through your hips. You can also shorten the range temporarily, then gradually explore a fuller movement as it feels comfortable.
You don’t need to complete every marked position in one workout. Choose a placement that suits your current strength and focus on smooth repetitions rather than speed. If you lose alignment or can’t control the lowering phase, pause and make the exercise easier. Stop if you feel sharp or worsening discomfort.
Build your color coded push up board workout around positions you can perform well, then add variety as your control improves. For guided hand placement, explore the Coded Push Up Muscle Board.
Color-Coded Board vs. Floor Push-Ups: What Should You Compare?
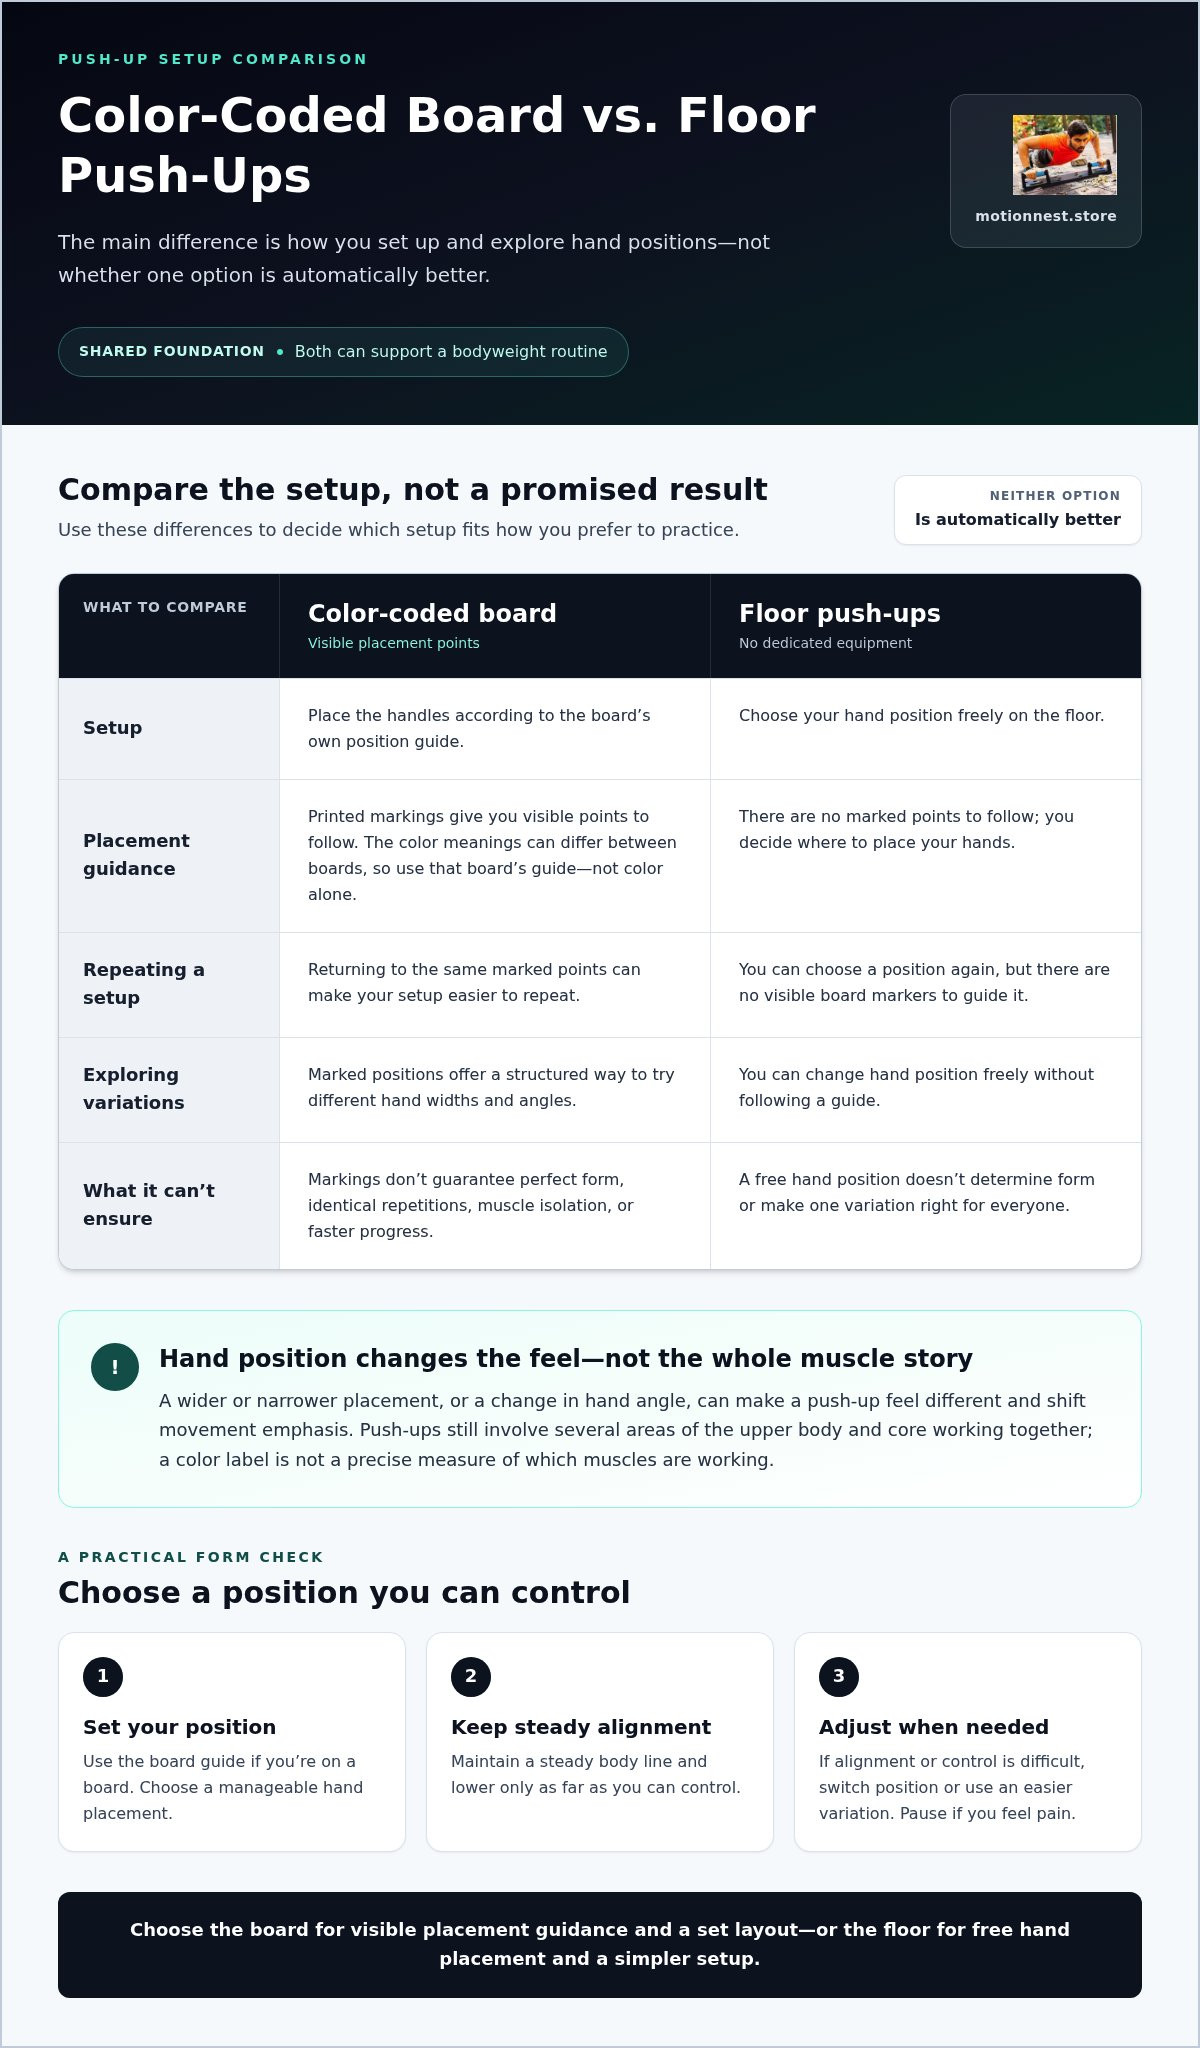
A board and the floor can both support a bodyweight routine. The main difference is how you set up and explore hand positions. A board may suit you if visible markers help you repeat placements and organize variations. Floor push-ups may be enough if you prefer freedom of movement and want to keep equipment to a minimum. Neither option guarantees better form, strength gains, or results on its own.
| What to compare | Color-coded board | Floor push-ups |
|---|---|---|
| Setup | Requires space for the board and time to position it before exercising. | Needs a clear floor area, with no dedicated board to set up. |
| Placement guidance | Marked positions offer visual cues; follow that board’s own guide. | You choose hand placement yourself, without printed position markers. |
| Exercise variety | A layout can help you compare marked placements in a structured way. | You can change hand width or body position without following a board map. |
| Learning curve | You’ll need to learn the board’s layout as well as practice sound push-up form. | You’ll need to find a comfortable hand position and practice controlled movement. |
When a board’s visual guidance may be useful
Marked positions can make it easier to return to a hand placement and compare how different setups feel. That can help you explore variations in a planned way instead of changing your hands at random. The University of Waterloo study on push-up variations offers a research reference for considering how variations relate to muscle activity. A board’s markers, however, are a placement guide, not a form coach.
Before each set, use the board’s instructions to choose a position, then check your alignment as you move. A layout can make setup more repeatable, but you still control your pace, range, and technique. Motion Nest’s Coded Push Up Muscle Board is one option for a board-based routine.
When floor push-ups may be enough
Floor push-ups suit people who want a straightforward exercise without storing or positioning extra equipment. You can practice variations by adjusting hand width or using a knee-supported version if needed. These options aren’t inferior to board exercises. They offer a different setup, without a marked map to follow.
Choose based on your routine and available space. A board may fit if you value visual placement cues and a structured way to revisit variations. The floor may be enough if you prefer minimal gear and self-directed hand placement. Either way, use a range of motion you can control and stop if movement causes pain.
A color coded push up board workout is most useful when the layout suits the way you practice. Consider how much guidance you want, whether you have room to store a board, and how easily you can follow its position instructions. Let these practical details, rather than assumptions about guaranteed results, guide your choice.
Build a Beginner Color-Coded Push-Up Board Workout
A beginner routine should be repeatable, not a test of how many board positions you can complete. Start with a comfortable variation, choose a small number of positions from your board’s guide, and adjust the effort to suit your current ability. Select a number of repetitions and sets that you can manage. End each effort while you can still move with control instead of pushing through tired, uneven repetitions.
A simple session structure using marked positions
Use this framework to organize a session. Move through the steps in order, allowing enough recovery between efforts to feel ready to continue.
- Warm up. Spend a few minutes moving comfortably. Include gentle shoulder, arm, and wrist movement before you begin.
- Choose positions. Pick a manageable push-up variation and a small number of placements from your board’s guide. You don’t need to try every marking.
- Work with control. Choose a number of repetitions and move at a steady pace. Stop when you can no longer maintain a smooth, consistent movement.
- Rest and reset. Pause between efforts. Give yourself time to recover, then make sure your hands are secure before starting again.
- Review. Note which positions and variations felt manageable. Use those notes to plan your next session.
Rest helps you return to the next effort with more control. For a beginner, repeatable movement is a more useful guide than speed or completing a fixed number of repetitions.
Form checks and sensible progressions
Before each repetition, place your hands securely and set your body in a steady line. Lower with control, then press back up without letting your hips sag or rise sharply. If a full push-up feels too difficult, use a knee-supported variation or reduce how far you lower. Choose the option that lets you move smoothly.
Make progress gradually by changing one factor at a time. You might try a different board position or add a few repetitions, as long as the movement remains controlled. If your form becomes inconsistent, return to the easier setup. Stop if you feel sharp pain or discomfort that worsens. Choose a suitable variation instead of pushing through it.
Keep your color coded push up board workout simple enough to repeat and adjust. To explore equipment for a board-based routine, browse Motion Nest’s special-use products, including the Coded Push Up Muscle Board.
Choose a Coded Push-Up Board That Fits Your Routine
A board is most useful when its layout is easy to understand and its positions support exercises you can perform with control. A crowded map or unclear color key can make setup harder, especially if you’re new to the equipment. Compare the position guide, markings, stability information, and storage fit. A readable guide matters more than assuming a particular color always means the same thing.
A practical checklist before choosing
Compare each option with your workout habits in mind. Focus on details explained in the product information, and separate stated features from assumptions.
- Position instructions: Look for a guide that shows where each handle goes and how to follow the layout. The positions should support the exercise variety you want.
- Readable markings: Check whether the placement markings look easy to distinguish. Use the supplied instructions to interpret them instead of relying on color alone.
- Stability information: Review the description for details about how the board is designed to stay steady during use. Appearance alone doesn’t tell you how it performs.
- Space and storage: Consider where you’ll exercise and where you’ll keep the board between sessions. Choose a setup that fits the space you can regularly use.
- Documented features: Compare what each product description states. Don’t assume accessories, construction details, or functions are included unless they’re specifically described.
Consider how often you expect to use the board, too. A layout that’s easy to understand and put away may feel more practical for a regular home routine than one that seems complicated to set up. If workout space is limited, decide where you’ll place the board during exercise and where you’ll store it afterward.
Find a board that supports a routine you will repeat
A long list of positions isn’t automatically an advantage. Start with variations you understand or can adapt comfortably. Choose a board whose instructions help you return to those setups, then explore other options at your own pace. A routine you can follow consistently may be more useful than a complicated layout you rarely use.
Motion Nest offers the Coded Push Up Muscle Board for shoppers considering a board-based routine. Compare its product information with the checklist above, and let your preferred exercises, available space, and need for placement guidance shape your choice. For a color coded push up board workout, choose a setup that makes it easier to plan a manageable session and return to it.
Ready to explore? Browse the Novelty & Special Use collection and consider whether the Coded Push Up Muscle Board fits your routine.
Make Your Next Push-Up Session Your Own
Your next step can be simple: choose a manageable placement, focus on steady movement, and build a routine you’ll want to repeat. A color coded push up board workout doesn’t need to include every position. Start with a setup that suits you today, then adjust as your confidence and control grow.
Motion Nest offers the Coded Push Up Muscle Board for shoppers who want a board-based routine. The store advertises worldwide shipping and a money-back guarantee.
Browse Motion Nest’s Novelty & Special Use collection and explore the Coded Push Up Muscle Board for your workout plans. Keep your first sessions comfortable, stay consistent, and build your practice one controlled repetition at a time.
Frequently Asked Questions
Is a color-coded push-up board good for beginners?
It can help beginners explore hand placements with visible cues. Start with a variation you can perform smoothly and use the board’s instructions to set up. The colors won’t teach form on their own, so check that your body stays steady through each repetition. If you can’t lower and press with control, shorten the range or choose an easier variation before trying a more demanding position.
Do the colors on every push-up board mean the same thing?
No. There’s no universal color key for every board. A color may point to a different position on another model, so don’t rely on a chart from a different product. Use the instructions for your board. Before choosing one, check whether its guide clearly shows where to place your hands and explains the marked positions.
Can a color-coded push-up board build strength without weights?
Push-ups use your body weight as resistance, and changing positions can add movement variety. A board doesn’t add weight or guarantee strength gains. Progress depends on consistent practice, suitable difficulty, recovery, and controlled technique. As a variation becomes easier, adjust one element of your color coded push up board workout, such as trying a more challenging movement, while keeping your repetitions smooth and manageable.
Can you use a push-up board for knee push-ups?
Many push-up variations can be adapted with your knees on the floor, but follow your board’s directions for hand placement. Keep a steady line from your knees through your shoulders, and move at a pace you can control. Before starting, check that the handles are placed securely. If the board shifts or the movement feels uncomfortable, stop and reassess the setup rather than continuing.
How often should you do a color-coded push-up board workout?
There’s no single schedule that suits everyone. Your activity level, recovery, and how challenging a session feels can affect how often you exercise. Start at a pace that leaves room to recover, especially after a demanding session, and adjust if your technique or comfort changes. If you’re returning after a long break or have health concerns, seek appropriate professional guidance before setting a routine.
Do you need a special mat to use a push-up board?
No, a special mat isn’t automatically required. Choose a clean, level surface where the board can sit securely and your hands or knees feel comfortable. Follow any surface guidance in the product instructions, and stop if the board slides during movement. A mat may add comfort in some setups, but it doesn’t replace checking that the board stays stable before and during exercise.